Everyone means to track inquiries. Almost nobody does, because typing in the ones that didn't book feels like paperwork for a guest you don't have.
So connect the email account your inquiries arrive at, and Rentalist reads the ones from Airbnb, Vrbo, and the other booking sites for you, guest, dates, party size, pet, source, and lines them up in a simple list. You accept the ones you want with a click. Nothing is ever saved without you.
It's optional. You can paste an email into the inquiry form yourself instead, and Rentalist will still fill in the details. Connecting an inbox just skips the copying and pasting.
The best part is a one-time payoff. Tell Rentalist how far back to look, a few months, a few years, or the whole mailbox, and it works back through your old inquiry emails while you carry on with something else.
If you've been renting from the same address for years, that's your entire inquiry history recovered in an afternoon instead of never. Which means conversion rates, booking lead times, and open-week timing are useful on day one rather than three seasons from now.
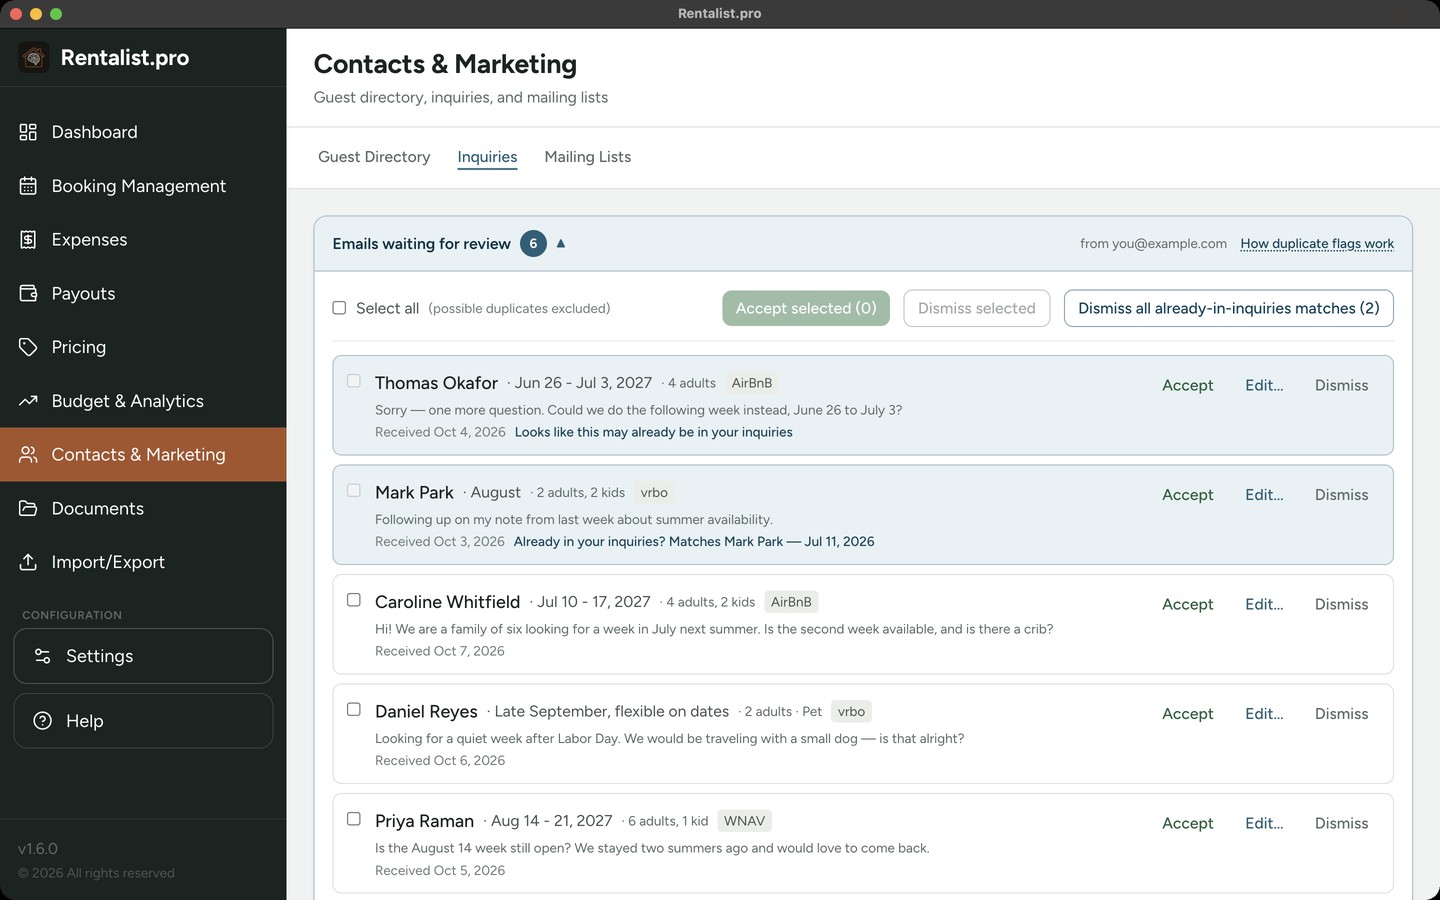
Found inquiries wait at the top of your Inquiries screen. Accept one, open it to adjust first, or dismiss it, and for a big history scan, select the lot and handle them together.
Rentalist does the tedious part before you see it. Booking sites often send the same inquiry twice; those get merged into one row. Anything that looks like an inquiry you already have is flagged and held out of bulk actions, so you can't accidentally add a guest twice. Confirmations and cancellations aren't new inquiries, so they go to Booking Management instead: a confirmation waits there for you to review before it becomes a booking, and a cancellation shows a notice that takes you to the booking, where you cancel it yourself. Payment notices and replies are filtered out entirely.
- Only booking-site emails, from platforms you've turned on. Rentalist looks at messages from Airbnb, Vrbo, and the other sites you've enabled in Settings → Platforms, and no other emails.
- Never your personal mail. Rentalist checks who each email is from, and for inquiries it only opens messages from the booking sites' notification addresses. The one exception is receipts: if you turn on "Look for receipts I email myself" on the Documents screen, Rentalist also reviews messages you send from your own address to yourself, or copy yourself on. Nothing else in your mailbox is ever opened, and nothing is ever saved without you accepting it.
- Direct inquiries you still paste yourself. A phone call or a direct email from a guest isn't from a booking site, so it won't appear here. Add those manually.
- Custom platforms. If you use a direct-booking site of your own, add its notification email or domain in Settings → Platforms (on that custom platform) and Rentalist will read its inquiry emails too. Left blank, that platform stays paste-only.
- Not everything from a booking site is a new inquiry. Even a real platform sender gets filtered out automatically when the message isn't clearly a fresh inquiry: a reply or forward inside an existing conversation, a cancellation notice, a payment or damage-protection notice, a reminder about a reservation, or a booking confirmation. Reservation confirmations are handled separately (see Adding Bookings from Email below).
Go to Settings → Property, under Email connection, and click "Connect an email account." Pick your provider, confirm your email address, and paste an app password. Then click Test & save connection. If it works, you'll be asked how far back to scan. Once connected, Rentalist reads this mailbox for inquiries and reservations automatically. Untick "Read inquiries and reservation emails" if you only want receipts, which is a separate switch right below.
Why an app password, not your normal password
Gmail, iCloud, Yahoo, and AOL don't let an app sign in with your everyday password when two-factor login is on. Instead you create a one-purpose app password: a long code that only reads mail and can be revoked anytime without changing your real password. Rentalist encrypts the app password before it stores it, and the key that decrypts it lives in your operating system's own vault, your Mac's Keychain or Windows' built-in data protection.
Where to make an app password
- Gmail: turn on 2-Step Verification, then make one at myaccount.google.com/apppasswords. Rentalist scans Gmail's "All Mail" so archived inquiries are still found. Gmail accounts from work or school (Google Workspace) may not offer app passwords.
- iCloud: account.apple.com → Sign-In and Security → App-Specific Passwords.
- Yahoo: login.yahoo.com/account/security → Generate app password.
- AOL: login.aol.com/account/security → Generate app password.
- Something else: choose "Other," then enter two things your provider's help pages list, usually under a heading like "email settings" or "IMAP settings": the incoming (IMAP) mail server name, and the port, which is almost always 993. Port 143 also works, as long as the server switches to a secure connection. Rentalist never signs in over an unprotected one.
The connection screen shows the exact link for your provider. Each of your properties may have its own booking email address scanned. If you use one address to catch inquiries from multiple properties, you may need to assign each inquiry to its appropriate property and dismiss it from the other properties' review trays.
Found inquiry emails appear at the top of the Contacts & Marketing → Inquiries screen, with a count of how many are waiting. Each row shows the guest's full name, the dates they asked about (or "dates unclear"), party size and pet, the detected source, a snippet of the message, and when the email arrived.
- Accept: one click adds it to your inquiries, exactly as if you'd typed it in.
- Edit…: opens the normal Add Inquiry form already filled in, so you can fix or add anything before saving.
- Dismiss: removes it from the tray. It won't come back.
- Accept selected / Dismiss selected: check several (or "Select all") and handle them together.
- Dismiss all already-in-inquiries matches: clears every blue row in one click, without touching the amber same-guest rows.
Blue rows look like an inquiry you already have. They are flagged "Looks like this may already be in your inquiries" and left out of "Select all", so a bulk accept won't re-add one. It's only a heads-up; you can still accept it if it really is new. Amber rows mean the same guest inquired again, a different message on a different day. Both rows sit next to each other so you can compare them, and you pick whichever one you want to keep. If you accept one row of an amber pair, its twin turns blue, because now it matches the inquiry you just added.
When an email's guest address exactly matches an inquiry you already have, and it arrived within a few days of that inquiry, Rentalist treats it as the very same inquiry and doesn't add a row for it at all. Nothing already in your inquiries is ever changed by this feature. Clicking Accept is the only thing that ever adds anything.
The first time you connect, Rentalist asks how far back to look: Last 3 months, Last year, Last 3 years, Everything, or a custom start date. If you're using a long-standing email address, it is best to set the look-back to when your property was first made available on a platform.
- It runs in the background, so you can keep working. A progress line shows what month it's on and how many emails it has checked, with a Pause button.
- If you quit mid-scan, it picks up where it left off next time you open the app.
- You can start (or restart) a history scan later with "Fill in my history…" on the connection panel.
It only checks while Rentalist is open. Rentalist checks when you start it, once an hour as you work, and whenever you click "Check now." It doesn't check in the background after you close its window. Every check picks up exactly where the last one left off, so closing Rentalist for a few days or a few weeks never creates a gap.
The same mailbox connection that finds your inquiries also spots reservation emails: a new Airbnb booking, a change, a cancellation. They collect in a review tray at the top of Booking Management, headed "Reservations found in your email." Nothing becomes a booking until you accept it. Rentalist reads the message, pulls out the guest, the dates, the payout and the confirmation code, and shows you what it found. You accept it, open it in the booking form first, or dismiss it.
- It checks when you open the app and once an hour while you work. It's the same mailbox scan that finds your inquiries.
- It never signs in to Airbnb, Vrbo, or any other platform. It reads email, and only email.
- Rows with no money say so. A confirmation that doesn't state the payout is marked "Money not found, add the payout" and always opens the booking form so you can fill it in. Rentalist will not invent a number. A row that states everything it needs, the dates and the money, which an Airbnb confirmation normally does, gets an Accept button instead: one click and it's a booking.
- Vrbo always asks you for the money, on purpose. Vrbo's reservation emails don't state the money in a way anyone can rely on, so Rentalist doesn't take figures out of them. You get the guest, the dates and the reservation number filled in, and you type the money.
- Rows that are already yours are marked "Already in your bookings" so a bulk accept can't create a double.
- Changes and cancellations don't change anything. A change email tells you what the platform is asking for and, where Rentalist can tell, whether those dates look open in your records. A cancellation email tells you what the platform said and takes you to the booking, where you cancel it yourself. Either notice stays in the list until your records match it, or until you ignore it.
- Locked years get no exemption. Accepting a reservation into a locked past year asks to unlock it first, exactly like typing one in by hand.
A saved email works too. If you'd rather not connect a mailbox, or a message never reached the tray, drag the saved email onto the paste box in the Add Inquiry window. Rentalist reads it and, if it turns out to be a reservation rather than an inquiry, sends it to the Bookings review list instead. It has to be a saved email file, an .eml (Apple Mail's .emlx counts too), which is what "Save as" produces in most mail programs. A PDF, a screenshot, or a message pasted into a document can't be read; paste the text in instead.
This feature reads your mail, so here is exactly what that means.
- It reads only the mailbox you connect, and only the messages that match what you've turned on, mail from the booking sites you've enabled, and, if you switch on receipt capture, mail arriving from your own address. The rest of your mail is left alone.
- It's read-only. It opens your mailbox in read-only mode and reads messages without marking them read, so it can't change, move, delete, or send anything.
- Nothing goes anywhere except between your computer and your own email provider, the same one your mail app already talks to. No cloud service, nothing sent to us, and no AI involved: the reading and parsing happen right on your computer.
- You give it a revocable app password, not your real one. It's encrypted before it's stored, and the key that decrypts it is held by your Mac or Windows, not by Rentalist. Neither the encrypted password nor the key ever goes into a backup, so if you restore a backup onto a new computer Rentalist keeps your account settings but asks you to type the app password again.
- A note on email: the From address on any email can be forged by a sender. Rentalist never acts on an email automatically, nothing is recorded until you review and accept it yourself. We mention this unlikely risk because we believe in disclosing it.
Setup is a few fields and a Test & save connection button, with a link straight to the right page for your provider.
The connection panel always shows a clear status line. Here's what the common messages mean:
- "Sign-in failed." Almost always the app password. For Gmail, AOL, Yahoo, and iCloud you must use an app password, not your normal password. Make a fresh one and paste it in.
- "Timed out reaching …" A network hiccup or a mistyped server name. Check your internet connection and, if you chose "Other," the IMAP server name.
- "Couldn't reach …" The server name or port looks wrong. Port 993 is standard.
- "Your email provider asked us to slow down." The provider is rate-limiting logins (AOL and Yahoo do this). It's not a wrong password. Rentalist backs off and tries again shortly.
- "The server refused the mailbox list." Usually the app-password step wasn't finished. Recreate the app password and try again.
- "Re-enter your email password to reconnect." Your settings are here but the saved password isn't on this computer, for example after restoring a backup onto a new machine. Type the app password again to reconnect.
- "… didn't offer a secure connection." The server wouldn't switch to a secure connection, so Rentalist didn't sign in. If your provider lists port 993, use that.
- "Rentalist couldn't confirm that it was really talking to …" The server's security certificate didn't check out, most often because the server name is mistyped.